Call RapidWright from C/C++ Using GraalVM
Several RapidWright users have wondered about the prospects of using RapidWright in a C or C++ application even though it is written in Java. Previously, the only option was to use the Java Native Interface (JNI) and run an instance of a JVM in order to make such communication possible. However, a new project called GraalVM provides some exciting new capabilities to Java as it is a universal virtual machine and compiler ecosystem built around the JVM. It has several features, but some highlights are:
As GraalVM is a JVM, it comes with new just-in-time compilation technology to run Java faster
Compile Java applications to native code for fast startup times
Write Java programs using interpreted languages such as Python, Ruby, JavaScript and also support their C extensions
Compile Java code as a native shared object library
In this article, we’ll focus on that last feature which enables us to package up RapidWright as a shared object library with header files to be called by C/C++ applications. To get started, we are going to target a Linux environment and use Bash commands for our example (GraalVM is still in the early stages for support in Windows).
For the impatient, we have provided an example tar ball with example source code and Makefile to run the entire flow, just run these four commands:
wget http://www.rapidwright.io/docs/_downloads/GraalVMExample.tar.gz
tar zxf GraalVMExample.tar.gz
cd GraalVMExample
make
For a more in depth explanation of how this all works, see the rest of the article below.
Get Setup
First, navigate to a directory where you would like to install/practice the steps provided in this article. We’ll need to install GraalVM and use the GraalVM Updater to install it’s native-image package:
wget https://github.com/oracle/graal/releases/download/vm-19.0.0/graalvm-ce-linux-amd64-19.0.0.tar.gz
tar zxf graalvm-ce-linux-amd64-19.0.0.tar.gz
export PATH=$PWD/graalvm-ce-19.0.0/bin:$PATH
gu install native-image
Next we’ll install RapidWright and set RAPIDWRIGHT_PATH:
git clone https://github.com/Xilinx/RapidWright.git
cd RapidWright
./gradlew compileJava
export RAPIDWRIGHT_PATH=$PWD
It turns out that the native compilation feature of GraalVM does not support certain kinds of reflection that are used in Jython, so we need to remove that dependency and associated code in order to create the shared object library:
rm RapidWright/src/com/xilinx/rapidwright/util/RapidWright.java
rm RapidWright/bin/com/xilinx/rapidwright/util/RapidWright.class
rm RapidWright/jars/{jython-standalone-2.7.0,jupyter-kernel-jsr223,jeromq-0.3.6,json,junit-4.12}.jar
Building a Bridge
Now that GraalVM and RapidWright have been installed and prepared, we can focus on building the bridge between Java and our native application. As Java and C/C++ are fundamentally different languages with differing runtimes, some additional effort is needed to enable cross-language APIs callable from C/C++. This article provides an example on how to create a few API wrappers for C/C++, however, we refer the reader to the GraalVM documentation and Javadocs for more advanced usage.
We will choose a couple RapidWright APIs we would like to make available in C++, they are the Java methods:
Device.getDevice(String deviceName)
Device.getTile(int column, int row)
To expose these two APIs to C/C++ using GraalVM, we need to declare two new methods and annotate them with @CEntryPoint. When annotating methods with @CEntryPoint, it must meet a few requirements, namely:
The Java method must be declared static
The @CEntryPoint annotation requires the C API name
(name = "functionName")The first parameter must be an execution context (IsolateThread or Isolate)
All other parameters must be Java primitive values (int, long, char, …), C helper classes (CCharPointer, CIntPointer,…) or a Java enum annotated with @CEnumLookup
Below is an example Java class RapidWrightAPI.java that illustrates how these two Java APIs could be implemented to provide the C interface requirements while accessing RapidWright Java functionality. Note that this Java class will need to be compiled with GraalVM as it imports special features from its native-image library.
package com.xilinx.rapidwright.examples;

import org.graalvm.nativeimage.IsolateThread;
import org.graalvm.nativeimage.c.function.CEntryPoint;
import org.graalvm.nativeimage.c.type.CCharPointer;
import org.graalvm.nativeimage.c.type.CTypeConversion;

import com.xilinx.rapidwright.device.Device;

public class RapidWrightAPI {

  @CEntryPoint(name = "loadDevice")
  public static void loadDevice(IsolateThread thread, CCharPointer deviceName) {
        String devName = CTypeConversion.toJavaString(deviceName);
        System.out.print("Loading device " + devName + "...");
        Device d = Device.getDevice(devName);
        System.out.println("DONE!");
  }

  @CEntryPoint(name = "getTileName")
  public static CCharPointer getTileName(IsolateThread thread, CCharPointer deviceName, int row, int column) {
        String devName = CTypeConversion.toJavaString(deviceName);
        Device d = Device.getDevice(devName);
        return CTypeConversion.toCString(d.getTile(row, column).getName()).get();
  }
}
The loadDevice() API is redundant because the getTileName() also will load the device if it is not already in memory, this is just to provide second point of illustration. Also note that GraalVM provides a set of utility methods to convert to and from Java and C types CTypeConversion such as Java Strings to C char*.
Ready to Build a .so (Linux Shared Object Library)
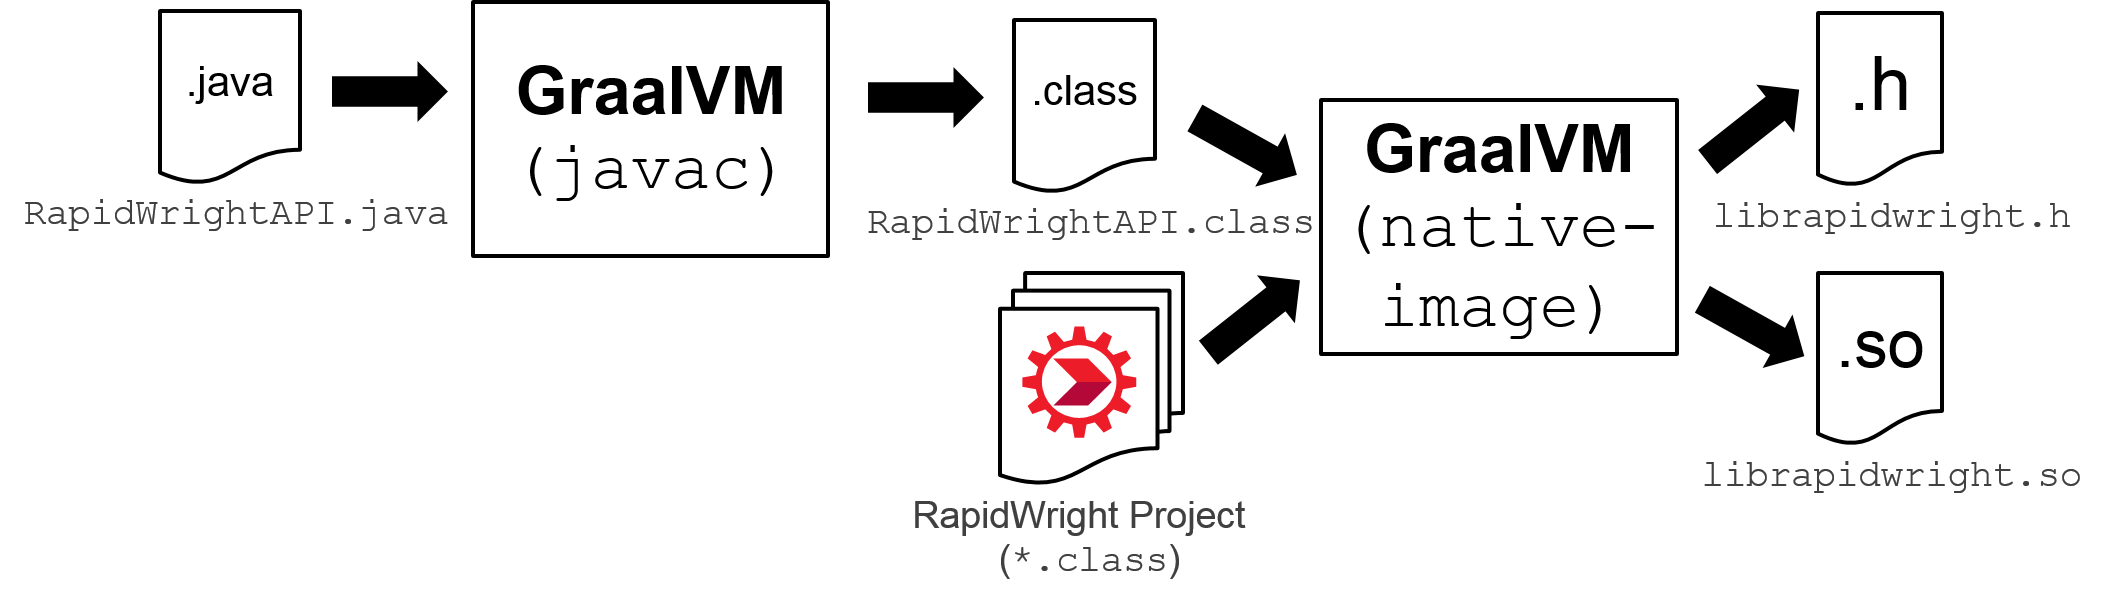
Now that we have a few APIs, we can test them out by using GraalVM to compile our example and then create a shared object library and header file as shown in the flow below:
Run the following commands to download the example API code, compile it and create a shared object library using GraalVM:
wget http://www.rapidwright.io/docs/_downloads/RapidWrightAPI.java -O $RAPIDWRIGHT_PATH/src/com/xilinx/rapidwright/examples/RapidWrightAPI.java
export CLASSPATH=$RAPIDWRIGHT_PATH/bin:$(find $RAPIDWRIGHT_PATH/jars -name '*.jar' | grep -Ev 'jython|jupyter|win64|jeromq|json|junit' | tr '\n' ':')
javac $RAPIDWRIGHT_PATH/src/com/xilinx/rapidwright/examples/RapidWrightAPI.java -d $RAPIDWRIGHT_PATH/bin
native-image --no-server -cp $CLASSPATH --no-fallback --initialize-at-build-time --shared -H:Name=librapidwright
If all goes well, you should now have a librapidwright.so and librapidwright.h file present in your current directory.
Testing it Out
Now for the fun part, we can create a C or C++ application that will make use of the new RapidWright APIs! Here’s a small C++ program that prints out a grid of tile names for a given device:
#include <iostream>
// This is the header file created by native-image (Graal)
#include <librapidwright.h>

using namespace std;

int main(int argc, char **argv) {
  // This is some Graal boilerplate code
  graal_isolate_t *isolate = NULL;
  graal_isolatethread_t *thread = NULL;

  if (graal_create_isolate(NULL, &isolate, &thread) != 0) {
        fprintf(stderr, "graal_create_isolate error\n");
        return 1;
  }
  // End boilerplate

  int maxRow = 105;
  int maxCol = 105;
  char * devName = argv[1];

  // Load the device in RapidWright, the device will be
  // persistent in memory until it is unloaded
  loadDevice(thread, devName);

  // Get tile names based on row/column indices and print out
  // the tile names for a few tiles
  for (int row = 100; row < maxRow; row++){
        for (int col = 100; col < maxCol; col++){
          std::cout << "Tile[" << col << "," << row << "] = \"" <<
        getTileName(thread, devName, row, col) << "\"" << std::endl;
        }
  }

  // Clean up Graal stuff
  if (graal_detach_thread(thread) != 0) {
        fprintf(stderr, "graal_detach_thread error\n");
        return 1;
  }

  return 0;
}
There is some GraalVM boilerplate before and after we use the APIs in RapidWright, but we can compile this with any C++ compiler. The program prints out all the tiles in grid between tiles located at (100,100) and (104,104) inclusive, or 25 different tile names. We can compile and run this program by running the following:
wget http://www.rapidwright.io/docs/_downloads/RapidWrightExample.cpp
g++ RapidWrightExample.cpp -I. -L. -lrapidwright
export LD_LIBRARY_PATH=.:$LD_LIBRARY_PATH && ./a.out xcvu9p
If all goes well, you should see the following output:
Loading device xcvu9p...DONE!
Tile[100,100] = "CLEL_R_X10Y803"
Tile[101,100] = "NULL_X101Y832"
Tile[102,100] = "NULL_X102Y832"
Tile[103,100] = "CLEM_X11Y803"
Tile[104,100] = "INT_X11Y803"
Tile[100,101] = "CLEL_R_X10Y802"
Tile[101,101] = "NULL_X101Y831"
Tile[102,101] = "NULL_X102Y831"
Tile[103,101] = "CLEM_X11Y802"
Tile[104,101] = "INT_X11Y802"
Tile[100,102] = "CLEL_R_X10Y801"
Tile[101,102] = "NULL_X101Y830"
Tile[102,102] = "NULL_X102Y830"
Tile[103,102] = "CLEM_X11Y801"
Tile[104,102] = "INT_X11Y801"
Tile[100,103] = "CLEL_R_X10Y800"
Tile[101,103] = "NULL_X101Y829"
Tile[102,103] = "NULL_X102Y829"
Tile[103,103] = "CLEM_X11Y800"
Tile[104,103] = "INT_X11Y800"
Tile[100,104] = "CLEL_R_X10Y799"
Tile[101,104] = "NULL_X101Y828"
Tile[102,104] = "NULL_X102Y828"
Tile[103,104] = "CLEM_X11Y799"
Tile[104,104] = "INT_X11Y799"
If you have questions or ideas on how to make better use of GraalVM, please post ideas and questions on the RapidWright forum.